
This article provides detailed steps on how to configure Google Chrome to use the full Citrix Receiver client, rather than the Lite client (HTML5). Under some circumstances, Chrome may revert to using the Lite client and this article will help you to switch to the full client experience.
If the Citrix HTML5 "lite" client is active, you'll notice the following changes:
- Your Cloud Desktop is no longer running full screen. Instead, it is running in a web browser tab
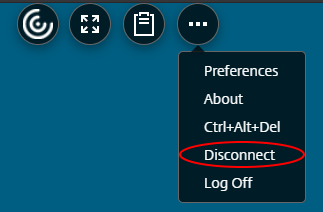
- The black, rectangular menu bar at the top of the screen has been replaced by a black and white semicircular menu:

- You no longer have access to your printers
- You may experience odd mouse or keyboard changes
If you are seeing your Cloud Desktop running in a web browser tab, please do the following:
- Click on the semicircular menu icon to reveal the menu
- Click on the three dots ... to reveal the other menu items
- Click on Disconnect
NOTE: before following the instructions below, make sure you are no longer connected to your Cloud Desktop.
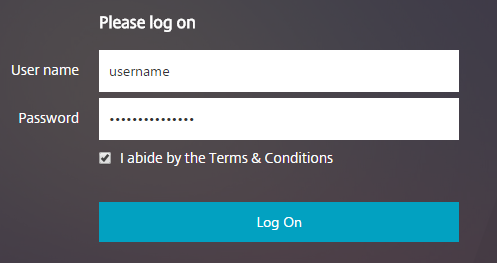
- Visit the VCIT Cloud Apps web portal using Google Chrome or Microsoft Edge
- In the center of the page, locate the login boxes and type in your VCIT user name and password
- By clicking on the "Log On" button, you are agreeing to the Terms and Conditions
- Once logged in, look for your name in the top right corner of the portal and click there to reveal a menu
- From the menu, select "Change Citrix Receiver"
- You will now see a welcome screen, with a "Detect Receiver" button - click that button

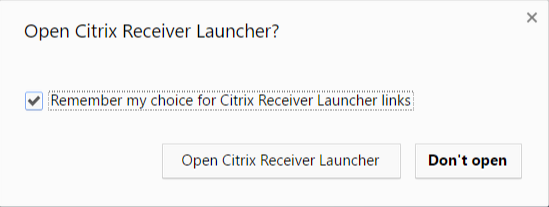
- The following popup window may appear. Enable the "Remember my choice..." checkbox, then click on the "Open Citrix Receiver Launcher" button
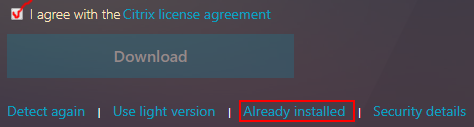
- Wait 5 seconds, as the browser should automatically return to the Cloud Apps web portal. If not, enable the "I agree..." checkbox, then click on "Already installed"
You should now experience the full Citrix Receiver client, including full screen mode, the black connection bar at the top of your Cloud Desktop, and full support for printers.
Comments
0 comments
Article is closed for comments.